Cookie Monster Cake Jars- Fun Treat Recipe
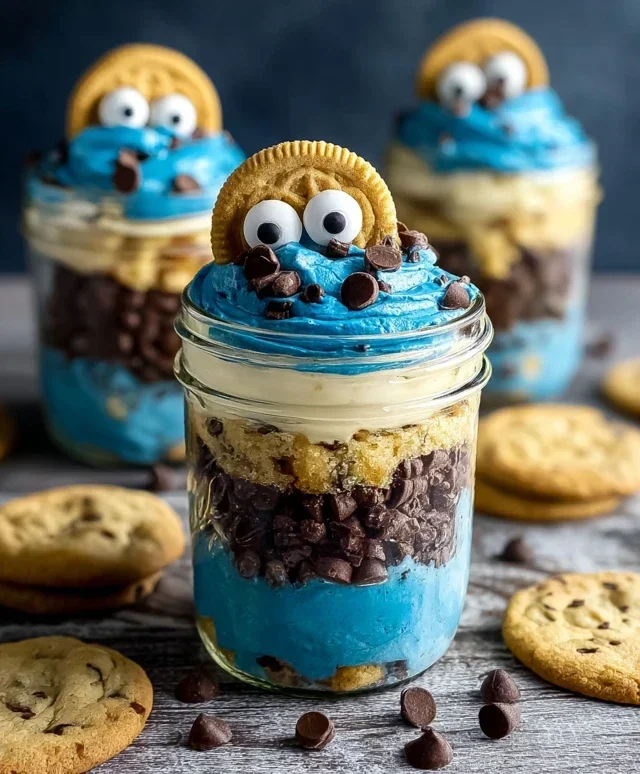
Cookie Monster Cake Jars are the ultimate treat for any fan of the iconic blue furry friend, and frankly, for anyone who loves a good dose of nostalgia and deliciousness! We all have a soft spot for Cookie Monster, right? His unwavering dedication to cookies is something we can all relate to. These adorable Cookie Monster Cake Jars capture that playful spirit, layering fluffy blue cake, creamy vanilla frosting, and of course, plenty of chocolate chip cookie crum extractbles. They’re not just a dessert; they’re a miniature party in a jar! What makes these special is the perfect blend of textures and flavors – the moist cake, the smooth frosting, and the satisfying crunch of the cookies. Plus, they’re so incredibly fun to make and even more fun to devour. Get ready to unleash your inner child and dive into these delightful Cookie Monster Cake Jars!
Cookie Monster Cake Jars
Get ready to unleash your inner Cookie Monster with these outrageously fun and delicious cake jars! Perfect for parties, gifts, or just a ridiculously delightful treat, these individual jars capture all the beloved flavors and textures of everyone’s favorite fuzzy blue monster. We’re talking fluffy cake, creamy frosting, and of course, plenty of crunchy cookies. Imagin extracte a portable, edible masterpiece that looks as amazing as it tastes. These are surprisingly simple to make, and the results are always a showstopper. Let’s dive in and create some cookie-fueled magic!
Ingredients:
Baking the Cake
The foundation of our Cookie Monster Cake Jars is a perfectly baked cake. We’re starting with a classic white or vanilla cake mix, which makes this process incredibly straightforward.
1. Prepare the Cake Batter: Follow the instructions on your 15 oz box of white or vanilla cake mix precisely. This usually involves combining the cake mix with the eggs, oil, and water specified on the packagin extractg. Whisk or beat the ingredients until the batter is smooth and well-combined. Don’t overmix, as this can lead to a tougher cake. A few lumps are perfectly fine!
2. Bake the Cake: Preheat your oven according to the cake mix box instructions. Grease and flour your baking pans. I like to use a standard 9×13 inch baking pan for this, as it gives us plenty of cake to crum extractble later. Pour the batter evenly into the prepared pan. Bake for the time recommended on the box, or until a toothpick inserted into the center comes out clean. Allow the cake to cool in the pan for about 10-15 minutes before inverting it onto a wire rack to cool completely. It’s crucial that the cake is entirely cool before moving on to the next steps to prevent the frosting from melting.
Crafting the Cookie Monster Frosting
Now for the star of the show – the vibrant, creamy, and utterly delicious Cookie Monster frosting! This is where we get our signature blue hue and incredible flavor.
3. Cream the Butter and Shortening: In a large mixing bowl, cream together the ½ cup (1 stick) of room temperature unsalted butter and ½ cup of vegetable shortening. Use an electric mixer on medium speed until the mixture is light and fluffy, with no visible streaks of butter or shortening. This takes a few minutes, so be patient. Creaming these fats together creates a stable and delicious frosting base. Make sure your butter is truly at room temperature – not melted, and not straight from the fridge.
4. Add Powdered Sugar and Liquids: Gradually add the 3 cups of powdered sugar to the creamed butter and shortening, mixing on low speed until incorporated. Once the sugar is mostly mixed in, increase the speed to medium-high and beat until smooth. Add 2 tablespoons of milk or coffee creamer and the 1 teaspoon of vanilla extract. Mix until well combined. If the frosting is too thick, add the remaining tablespoon of milk or coffee creamer, a little at a time, until you reach your desired consistency. It should be smooth, spreadable, and hold its shape.
5. Achieve the Perfect Blue: This is the fun part! Add 1 drop of electric blue Americolor gel color and 2 drops of royal blue Chef Masters gel color to the frosting. Mix thoroughly with your electric mixer until the color is uniform and resembles the iconic Cookie Monster blue. Gel colors are highly concentrated, so a little goes a long way. If you want a deeper blue, add another drop of the royal blue color, but be careful not to overdo it. Mix until you achieve a beautifully vibrant Cookie Monster hue.
Assembling the Cake Jars
It’s time to bring it all together and create these adorable individual treats!
6. Crum extractble the Cake and Prepare the Mix-ins: Once the cake is completely cool, crum extractble it into a large bowl. You want small, bite-sized pieces, not fine crum extractbs. Next, prepare your cookie mix-ins. Roughly chop 8-10 Oreos and 8-10 chocolate chip cookies. You want a good variety of textures and flavors. Gently fold these chopped cookies into the crum extractbled cake. This adds those delightful cookie chunks that make these jars so special.
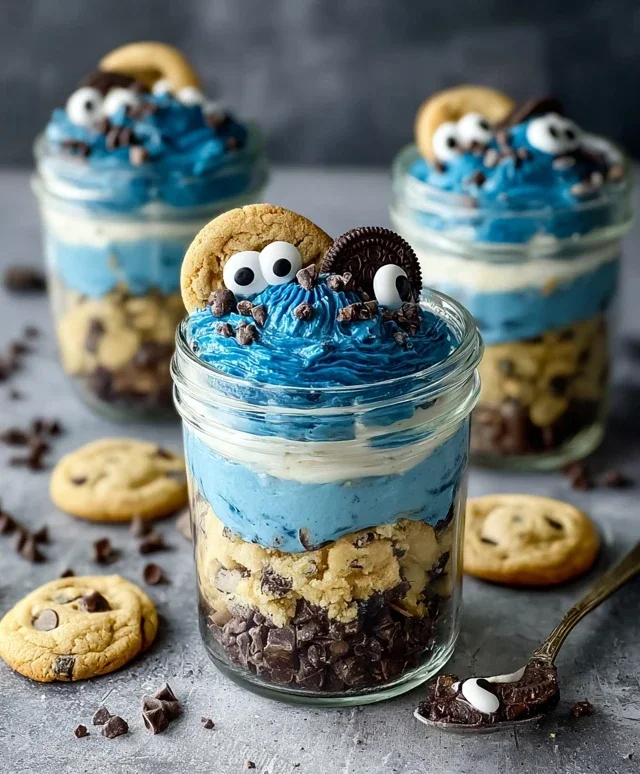
7. Layering the Goodness: Grab your clean glass jars (about 8-10 oz size works well). We’re going to layer the cake and frosting to create beautiful visual appeal and perfect flavor distribution. Start with a layer of the crum extractbled cake and cookie mixture at the bottom of each jar. Top this with a generous dollop of the blue Cookie Monster frosting. You can pipe it on for a neater look, or simply spoon it in. Repeat the layers, alternating cake mixture and frosting, until your jars are almost full, leaving a little space at the top for decorating. Make sure to end with a layer of frosting.
8. Decorate and Chill: Now for the finishing touches that make these truly Cookie Monster! Sprinkle the remaining chopped Oreos and chocolate chip cookies over the top of the frosting. This adds an extra layer of crunch and visual interest. Gently press 2 candy eyes into the frosting on each jar to give them their signature Cookie Monster face. For an extra playful touch, you can stick a piece of a chocolate chip cookie, cut in half, next to the eyes as if they’re peeking out. If you’re feeling fancy, tie a blue ribbon around the rim of each jar for a festive presentation. Once decorated, cover the jars and refrigerate for at least 30 minutes to allow the flavors to meld and the frosting to set slightly. These are best enjoyed chilled!
Conclusion:
And there you have it – your very own Cookie Monster Cake Jars! This recipe is an absolute winner because it’s not only incredibly fun and visually appealing, but it’s also surprisingly easy to whip up. Perfect for parties, a special treat, or just because you’re craving a burst of blue delight, these cake jars are guaranteed to bring smiles. The individual portions make them fantastic for picnics, school lunches, or even as a grab-and-go dessert. For serving, simply present them chilled with a spoon for immediate enjoyment. You can get creative with variations too! Consider adding mini chocolate chips to the cake batter for extra texture, or swirl in some extra blue food coloring into the frosting for a deeper Cookie Monster hue. Don’t be afraid to experiment with edible googly eyes or sprinkles for that extra wow factor. I truly encourage you to give these Cookie Monster Cake Jars a try. They are a delightful way to bring a little bit of playful joy into your day.
Frequently Asked Questions:
Can I make these ahead of time?
Absolutely! These cake jars are perfect for making a day or two in advance. Store them covered tightly in the refrigerator. The cake will stay moist, and the flavors will meld beautifully. Just remember to add any decorative elements like sprinkles or edible eyes just before serving to keep them looking their best.
What kind of cake can I use as a base?
While the recipe calls for a classic vanilla cake, feel free to get creative! A simple yellow cake, a funfetti cake, or even a slightly denser pound cake would work wonderfully as a base for your Cookie Monster Cake Jars. The key is to ensure it’s baked and cooled completely before layering.
How long do they last in the refrigerator?
Properly senon-alcoholic aled in the refrigerator, your Cookie Monster Cake Jars should stay fresh and delicious for up to 3-4 days. Make sure the lids are on securely to prevent them from drying out.
Cookie Monster Cake Jars
Adorable and delicious individual dessert jars inspired by Cookie Monster, featuring layers of blue cake, cookies, and creamy frosting.
Ingredients
-
15 oz box white or vanilla cake mix
-
Ingredients called for on cake mix box (typically eggs, oil, and water)
-
10 Oreos, chopped (divided)
-
½ cup (1 stick) unsalted butter, room temperature
-
½ cup vegetable shortening
-
3 cups powdered sugar
-
2-3 tablespoons milk or coffee creamer
-
1 teaspoon vanilla extract
-
1 drop electric blue Americolor gel color
-
2 drops royal blue Chef Masters gel color
-
8-10 Oreos, chopped
-
8-10 chocolate chip cookies, chopped
-
8 candy eyes
-
2 chocolate chip cookies, cut in half
-
Blue ribbon (optional, for decorating jars)
Instructions
-
Step 1
Prepare cake mix according to package directions. Bake the cake. Once cooled, crumble the cake into a bowl. -
Step 2
In a large bowl, beat together the softened butter and vegetable shortening until smooth. Gradually add the powdered sugar, alternating with the milk or coffee creamer, until the frosting is light and fluffy. Stir in the vanilla extract. -
Step 3
Divide the frosting into two bowls. Tint one bowl with the electric blue gel color and the other with the royal blue gel color until desired shades are achieved. Mix 1 tablespoon of chopped Oreos into the blue frosting. -
Step 4
In separate small bowls, mix the remaining chopped Oreos and chopped chocolate chip cookies. -
Step 5
Assemble the cake jars by layering crumbled cake, blue frosting (tinted blue with blue gel color), cookie crumbles, and dollops of the remaining frosting. Add candy eyes and half chocolate chip cookies for decoration. Repeat layers until jars are full. -
Step 6
Chill the cake jars for at least 30 minutes before serving. Decorate with a blue ribbon if desired.
Important Information
Nutrition Facts (Per Serving)
It is important to consider this information as approximate and not to use it as definitive health advice.
Allergy Information
Please check ingredients for potential allergens and consult a health professional if in doubt.