Viral Keto Onion Rings Hack-High Protein No Fry
Viral high-protein keto onion rings hack (no breadcrum extractbs, no frying!) are about to revolutionize your snack game. Forget everything you thought you knew about enjoying crispy, savory onion rings while sticking to your keto or low-carb goals. We all crave that satisfying crunch and golden-brown perfection, but the carb-heavy breading and greasy frying often stand in the way. That’s where this genius hack comes in. It delivers all the deliciousness you love – that sweet, caramelized onion, the irresistible savory coating – without any of the guilt. Prepare to be amazed as we unveil a method that is unbelievably simple, requires zero deep frying, and most importantly, packs a serious protein punch. Get ready to impress yourself and anyone you share these with with this incredible keto onion rings revelation!
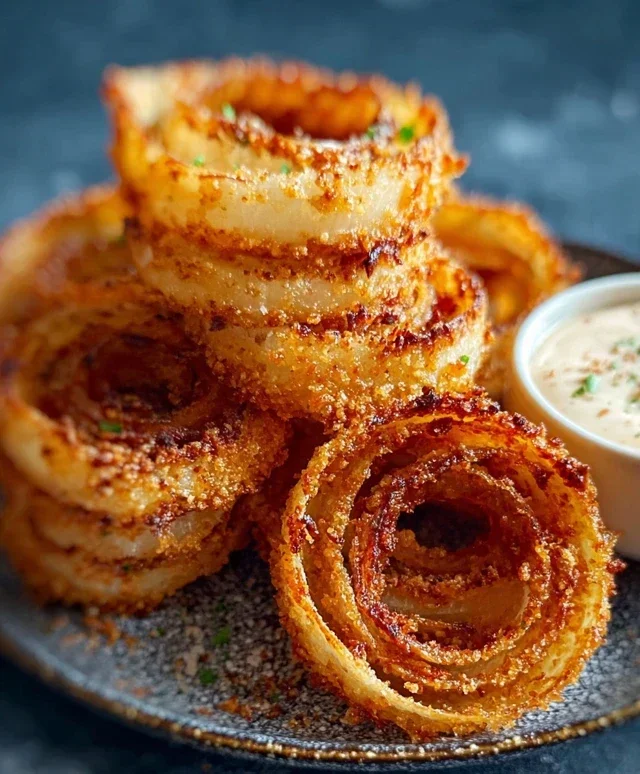
Ingredients:
Get ready for a game-changer in your keto snacking world! You’ve seen them, you’ve craved them, and now, I’m here to share the secret to achieving that satisfying, crispy onion ring crunch without a single breadcrum extractb and, best of all, without the mess and hassle of frying. This viral hack is surprisingly simple and delivers incredible flavor and texture, making it perfect for satisfying those savory cravings while staying true to your keto lifestyle. We’re talking about pure, unadulterated cheesy goodness that mimics the beloved onion ring experience in a way you won’t believe. Forget everything you thought you knew about keto snacks, because this is about to become your new go-to.
The magic behind this recipe lies in the brilliant use of shredded parmesan cheese as our “breading.” When baked, this cheese transforms into a gloriously crispy, golden shell that perfectly hugs the sweet, tender onion rings. It’s a culinary alchemy that feels almost too good to be true, but trust me, the results are absolutely sensational. We’re keeping it super simple with just a few pantry staples to elevate the natural sweetness of the onions and the savory depth of the parmesan.
Preparation: Getting Your Rings Ready
The first step is crucial for achieving perfectly cooked onion rings. We need to prepare our onions and then create our flavorful “coating.” This process is straightforward and sets the stage for the delicious transformation that’s about to happen in the oven.
1. Begin extract by preparing your onions. You’ll want to use white onions for their slightly sharper flavor and excellent texture when cooked. Carefully slice them into approximately 1/4 inch thick rings. It’s important to get this thickness right – too thin and they might burn, too thick and they might not cook through properly. You can gently separate the rings at this stage, but don’t worry if they’re still somewhat connected; they’ll loosen up as they bake. Pat the onion rings thoroughly with paper towels. This is a key step! Removing excess moisture from the onions will help the parmesan cheese adhere better and promote a crispier end result. Think of it as giving the cheese a dry surface to cling to.
2. Next, let’s create our cheesy “breading” mixture. In a shallow bowl or plate, combine the 2 cups of shredded parmesan cheese. Now, it’s time to season this cheesy base to perfection. Add salt, garlic powder, and paprika to your liking. Don’t be shy with the seasonings – they are what will infuse your onion rings with incredible flavor. I also like to add a generous pinch of Italian seasoning for an extra herbaceous punch. You can adjust these spices based on your personal preference. Some people love a little heat, so a pinch of cayenne pepper would be a fantastic addition if you’re feeling adventurous.
The Cheesy Coating Process
This is where the real fun begin extracts. We’re going to coat each onion ring in our cheesy mixture, ensuring they are fully enveloped for maximum flavor and crispiness.
3. Now comes the satisfying part: coating the onion rings. Take each separated onion ring and press it firmly into the seasoned parmesan cheese. Ensure that both sides of the ring are generously coated. You want a good, thick layer of cheese to form that crispy crust. Gently press the cheese onto the onion to help it stick. If the cheese isn’t adhering well, it’s likely because the onion rings weren’t dried sufficiently in the first step. Don’t be afraid to really pack the cheese on. You can even double-dip if you want an extra thick, crunchy coating. Make sure you have a plate or baking sheet nearby to place the coated rings on.
Baking to Crispy Perfection
The oven is our secret weapon for achieving that irresistible crunch without any frying. We’ll bake these beauties until they’re golden brown and wonderfully crisp.
4. Preheat your oven to 400 degrees Fahrenheit (200 degrees Celsius). Line a baking sheet with parchment paper. This is essential for preventing the cheese from sticking to the pan and ensuring an even bake. Carefully arrange the cheese-coated onion rings on the prepared baking sheet in a single layer. Make sure they are not touching each other. This will allow hot air to circulate around each ring, promoting even cooking and crisping. If the rings are crowded, they will steam rather than crisp up. You might need to use two baking sheets if you have a large batch.
5. Bake the onion rings for 10-15 minutes, or until they are beautifully golden brown and crispy. Keep a close eye on them during the last few minutes of baking, as cheese can go from perfectly golden to burnt very quickly. The exact baking time will depend on your oven and how thickly they are coated. You’re looking for that satisfying crunch that signals they’re ready. Once they’re done, carefully remove the baking sheet from the oven. Let the onion rings cool on the baking sheet for a few minutes before serving. This allows them to firm up a bit more and makes them easier to handle. They are best enjoyed warm, but they’re still delicious at room temperature.
These high-protein, keto-friendly onion rings are a testament to the power of simple ingredients and clever techniques. They are incredibly satisfying, guilt-free, and ridiculously easy to make. Serve them with your favorite keto-friendly dipping sauces like sugar-free ketchup, ranch, or a spicy aioli for an ultimate snack or appetizer experience. Enjoy this delightful hack that brings the joy of onion rings back into your keto life!

Conclusion:
You’ve now unlocked the secret to incredibly satisfying, viral high-protein keto onion rings hack that are surprisingly easy to make and completely guilt-free! By ditching the traditional breadcrum extractbs and the messy, unhealthy frying process, we’ve created a crispy, flavorful alternative that fits perfectly into your keto lifestyle. These aren’t just a snack; they’re a delicious way to add some fun and texture to your meals. Imagin extracte enjoying that satisfying crunch without derailing your macros – it’s a keto dream come true!
Serve these delightful rings alongside your favorite keto burgers, grilled chicken, or as a standalone appetizer with a side of sugar-free dipping sauce like ranch or sriracha mayo. For variations, consider adding a pinch of garlic powder or smoked paprika to the cheese mixture for an extra flavor kick, or even a sprinkle of nutritional yeast for a cheesy, umami boost. Don’t be afraid to experiment! I truly encourage you to give this recipe a try; I’m confident you’ll be amazed at how delicious and easy it is to achieve that perfect keto-friendly crispness.
Frequently Asked Questions:
Q: Can I use a different type of cheese?
A: Absolutely! While the recipe often calls for a sharp cheddar, you can experiment with other hard, low-carb cheeses like Parmesan, Gruyere, or Monterey Jack. Ensure the cheese you choose melts well and has a low moisture content for the best crispy results.
Q: How do I store leftovers?
A: These are best enjoyed fresh, as they can lose some of their crispness when stored. However, if you do have leftovers, let them cool completely and store them in an airtight container at room temperature for a day or two. Reheat them in a toaster oven or air fryer for a few minutes to help restore some of their crunch.
Q: What if my “rings” aren’t holding their shape?
A: Make sure you’re pressing the cheese mixture firmly around the onion slices. The cheese needs to create a solid casing. If the mixture is too sticky, try chilling it briefly before coating the onions. Also, ensure your onion slices aren’t too thick; about 1/4-inch thickness works best.
Viral High-Protein Keto Onion Rings Hack (No Breadcrumbs, No Frying!)
Enjoy crispy, savory keto onion rings without the carbs or mess of frying. This viral hack uses shredded parmesan for a delicious, guilt-free alternative.
Ingredients
-
2 white onions (sliced into 1/4 inch thick rings)
-
2 cups shredded parmesan cheese
-
1/2 teaspoon salt
-
1/2 teaspoon garlic powder
-
1/2 teaspoon paprika
-
1/2 teaspoon Italian seasoning
Instructions
-
Step 1
Preheat your oven to 400°F (200°C). Line a baking sheet with parchment paper. -
Step 2
Separate the sliced onion rings. -
Step 3
In a shallow dish, combine the shredded parmesan cheese with salt, garlic powder, paprika, and Italian seasoning. Mix well. -
Step 4
Dip each onion ring into the parmesan mixture, pressing gently to coat both sides evenly. -
Step 5
Place the coated onion rings in a single layer on the prepared baking sheet. -
Step 6
Bake for 15-20 minutes, flipping halfway through, until the parmesan is golden brown and crispy. -
Step 7
Let cool slightly before serving. Enjoy!
Important Information
Nutrition Facts (Per Serving)
It is important to consider this information as approximate and not to use it as definitive health advice.
Allergy Information
Please check ingredients for potential allergens and consult a health professional if in doubt.