Easy Lemon Truffles – Zesty Homemade Treats
Lemon truffles are little bursts of sunshine, aren’t they? There’s something utterly delightful about biting into a smooth, rich chocolate shell to discover a creamy, zesty center that sings with the bright, invigorating flavor of fresh lemon. These aren’t your everyday chocolates; these lemon truffles are an experience. They’re the perfect antidote to a gloomy day, a sophisticated treat to impress guests, or simply a little pick-me-up just for you. What makes them so special is the exquisite balance – the deep, decadent sweetness of chocolate perfectly complemented by that sharp, tangy citrus kick. It’s a flavor combination that awakens the palate and leaves you craving just one more. Get ready to create these exquisite little gems that are guaranteed to disappear in a flash.
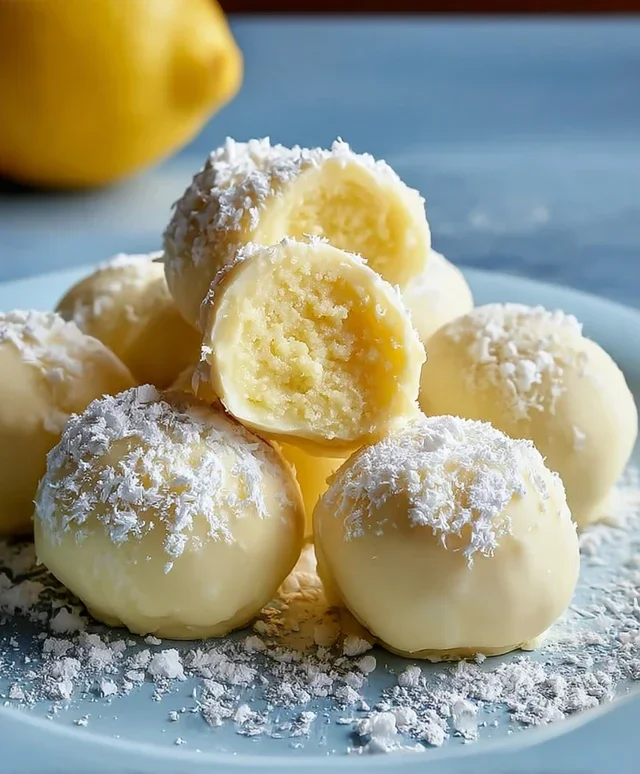
Lemon Truffles
There’s something incredibly elegant and surprisingly simple about homemade truffles. And when you add the bright, zesty flavor of lemon, you get a treat that’s both sophisticated and refreshingly delightful. These Lemon Truffles are no exception. They’re perfect for a special occasion, a thoughtful handmade gift, or just a little self-indulgent treat to brighten your day. The best part? They require no baking and come together relatively quickly, making them an accessible indulgence for any home cook. We’re going to create a smooth, creamy filling bursting with citrusy goodness, and then coat them in a beautiful finish. Let’s get started!
Ingredients:
Crafting the Lemon Truffle Base
The foundation of our lemon truffles is a rich, creamy mixture that’s both decadent and easy to handle. We’ll be combining softened cream cheese (or coconut butter for a dairy-free option) with softened butter (or more coconut butter) to create a smooth, luscious base. Softening these ingredients is key; it ensures they blend seamlessly without any lumps, resulting in a superior truffle texture. If you’re using cream cheese, make sure it’s truly softened, not melted. You can leave it on the counter for about an hour, or gently microwave it in 10-second intervals, stirring in between, until it’s pliable. The same applies to butter.
The sweetness comes from powdered sugar, which dissolves beautifully into the creamy base, leaving no gritty texture. If you’re looking for a sugar-free option, erythritol is an excellent substitute. Measure it carefully to ensure the right balance of sweetness without overwhelming the delicate lemon flavor.
Now, for the star of the show: the lemon zest. This is where all that bright, aromatic citrus flavor comes from. Be sure to zest only the yellow part of the lemon’s skin, avoiding the bitter white pith. A microplane zester is ideal for this, as it creates fine, fragrant zest that disperses evenly throughout the mixture. The amount of zest from one medium lemon should be perfect, but if you’re a true lemon lover, feel free to add a little extra for an even more intense citrus punch.
If you’re using white chocolate chips, this is the stage where they come into play. These will add a subtle sweetness and a hint of creamy richness to the truffle filling. You can either melt them separately and stir them in, or simply add them directly to the mixture if they are small enough to soften and incorporate during blending. If they are larger chips, a quick melt in the microwave (in 20-second increments, stirring between each) will ensure they blend smoothly.
For a touch of visual appeal, you might consider adding a drop of natural food coloring or a tiny pinch of turmeric. Turmeric, in particular, offers a beautiful, subtle yellow hue reminiscent of sunshine and lemons, and it’s a natural way to enhance the color without artificial ingredients. Just a tiny amount is needed to achieve a delicate tint.
Step-by-Step Truffle Assembly
1. Combine the Creamy Base: In a medium bowl, add the softened cream cheese (or coconut butter) and the softened butter (or additional coconut butter). Using an electric mixer on medium speed, or a sturdy whisk, cream these together until they are light, fluffy, and completely smooth. This process incorporates air, which will contribute to the final texture of your truffles. Make sure there are no lumps of butter or cream cheese visible. Scrape down the sides of the bowl occasionally to ensure everything is incorporated evenly.
2. Sweeten and Zest: Add the powdered sugar (or erythritol) and the finely grated lemon zest to the creamed mixture. Continue to mix on low speed at first, to prevent the powdered sugar from flying everywhere, then gradually increase the speed to medium. Beat until everything is well combined and the mixture is smooth and homogeneous. The zest should be visible throughout the filling, promising that burst of lemon flavor in every bite. If you are adding the white chocolate chips now, ensure they are softened or melted before incorporating them fully.
3. Add Color (Optional): If you are using a drop of natural food coloring or a pinch of turmeric, add it to the mixture now. Start with a very small amount – you can always add more, but you can’t take it away! Mix on low speed until the color is evenly distributed and you have achieved your desired subtle hue. The goal is a gentle tint that hints at the lemon flavor within.
4. Chill the Mixture: Cover the bowl tightly with plastic wrap, ensuring the wrap is pressed directly onto the surface of the mixture to prevent a skin from forming. Refrigerate the mixture for at least 1 to 2 hours, or until it is firm enough to roll into balls. This chilling step is crucial. It allows the fats to solidify, making the mixture much easier to handle and roll into neat, uniform shapes without becoming sticky and unmanageable. If the mixture is too soft, your truffles will be messy and difficult to work with.
5. Shape the Truffles: Once the mixture is firm, take it out of the refrigerator. Use a small cookie scoop or a tablespoon to portion out the mixture. Roll each portion between the palms of your hands to form smooth, compact balls. This is where you can make them as uniform as you like. If the mixture starts to soften and become sticky as you work, pop it back into the refrigerator for another 15-20 minutes to firm up again. It’s helpful to have a small bowl of water or extra powdered sugar nearby to lightly dampen your hands if they get too sticky.
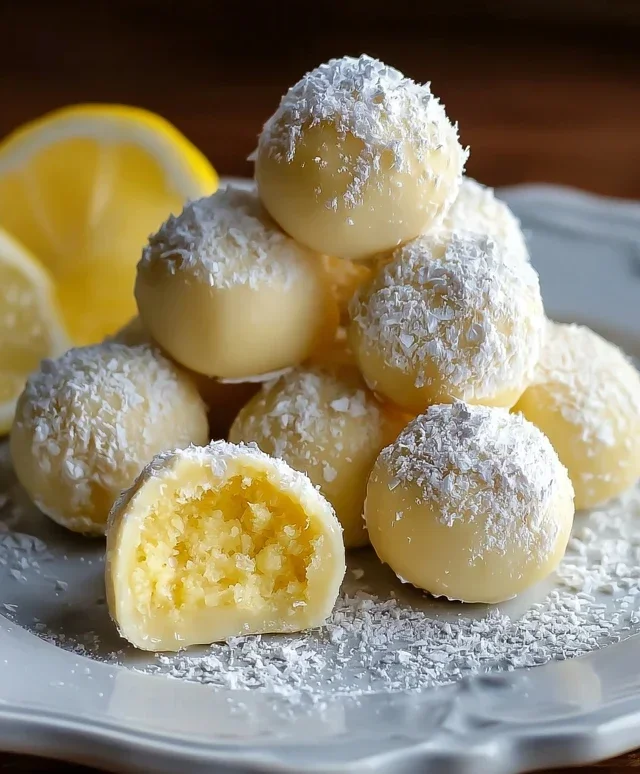
6. Coat and Decorate: Now for the finishing touch! You can simply roll your lemon truffles in a dusting of powdered sugar or finely grated lemon zest for a rustic look. For a more elegant finish, you can melt additional white chocolate chips and dip the chilled truffle balls into the melted chocolate, allowing the excess to drip off. Place the coated truffles on parchment paper to set. You can also sprinkle them with edible glitter, a few more flecks of lemon zest, or a drizzle of contrasting melted chocolate while the coating is still wet.
Once coated and decorated, place the truffles back in the refrigerator for at least 30 minutes to allow the coating to set completely. These lemon truffles are best stored in an airtight container in the refrigerator and are a delightful way to enjoy a burst of citrusy sunshine. Enjoy!
Conclusion:
I hope you’ve enjoyed learning how to create these delightful Lemon Truffles! This recipe is truly wonderful because it’s surprisingly simple to make, yet delivers an elegant and sophisticated dessert that’s bursting with bright, zesty flavor. The creamy, melt-in-your-mouth texture combined with the vibrant lemon essence makes these a perfect treat for any occasion. They look beautiful on a dessert platter and are sure to impress your guests or simply brighten your own afternoon. Whether you’re a seasoned baker or just starting out, these lemon truffles are a rewarding project with a delicious payoff.
I encourage you to give these a try! They are fantastic served chilled, perhaps with a cup of tea or coffee. For an extra touch of elegance, you could dust them with a little edible glitter or arrange them in small decorative paper cups. Don’t be afraid to get creative with variations either! You could add a hint of lavender to the ganache for a floral twist, or a touch of finely chopped candied gin extractger for a little spicy warmth. You could also experiment with different coatings, like finely chopped pistachios or even a delicate white chocolate drizzle. So go ahead, whip up a batch, and savor the sunshine in every bite!
Frequently Asked Questions about Lemon Truffles:
Q: How long do these Lemon Truffles last?
A: Stored in an airtight container in the refrigerator, these lemon truffles will stay fresh for about 1-2 weeks. Make sure to let them come to room temperature for a few minutes before serving for the best texture.
Q: Can I use store-bought lemon juice?
A: While fresh lemon juice is always recommended for the brightest flavor, you can use good quality bottled lemon juice in a pinch. Just be aware that the flavor might be slightly less vibrant.
Lemon Truffles
Delightful, no-bake lemon truffles bursting with citrus flavor. These creamy treats are perfect for a quick dessert or a special occasion.
Ingredients
-
4 oz cream cheese, softened
-
2 tbsp butter, softened
-
3 tbsp powdered sugar
-
Zest of one lemon
-
3 oz white chocolate chips
-
Optional drop of natural food coloring for color
Instructions
-
Step 1
In a medium bowl, combine the softened cream cheese and softened butter. Beat until smooth. -
Step 2
Gradually add the powdered sugar and lemon zest, mixing until well combined. -
Step 3
If using, stir in white chocolate chips and any optional food coloring. -
Step 4
Chill the mixture in the refrigerator for at least 30 minutes, or until firm enough to roll. -
Step 5
Roll the mixture into small balls, about 1-inch in diameter. -
Step 6
Place the rolled truffles on a parchment-lined baking sheet and refrigerate for another 15-20 minutes to set.
Important Information
Nutrition Facts (Per Serving)
It is important to consider this information as approximate and not to use it as definitive health advice.
Allergy Information
Please check ingredients for potential allergens and consult a health professional if in doubt.