Raspberry Lemon Cake- Zesty & Sweet Delight
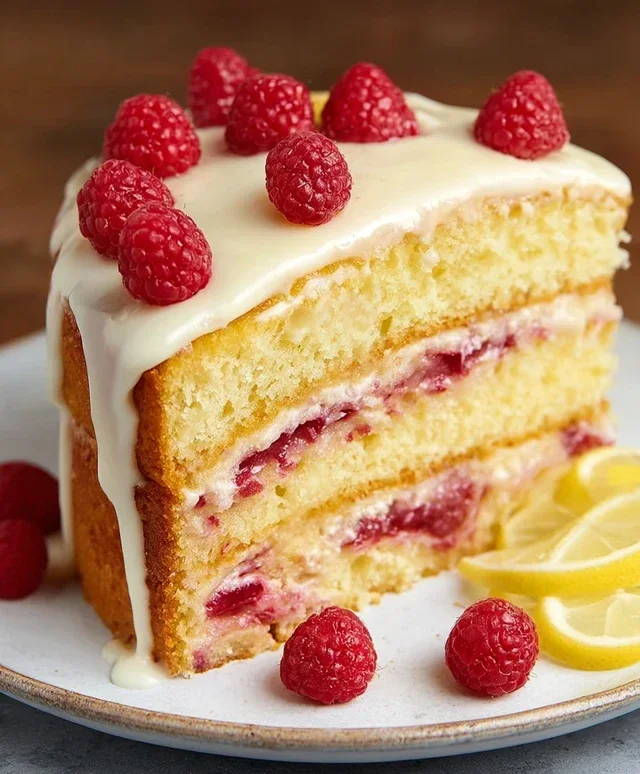
Raspberry Lemon Cake. Ah, the very name conjures images of sunshine, sweet summer days, and that perfect balance of tart and sweet. This isn’t just any cake; it’s a vibrant symphony of flavors that’s guaranteed to brighten your day. I’ve always adored how the bright, zesty punch of lemon cuts through the rich, buttery cake, while bursts of juicy raspberries add pops of delightful sweetness and a gorgeous, jewel-toned hue. It’s the kind of dessert that feels both elegant and wonderfully comforting, making it perfect for any occasion, from a casual afternoon tea to a celebratory gathering. What truly sets this Raspberry Lemon Cake apart is the effortless way these two classic partners dance together, creating a light, moist crum extractb that’s utterly irresistible. Prepare to fall in love!
Raspberry Lemon Cake
There’s something incredibly uplifting about a slice of vibrant, zesty raspberry lemon cake. The bright, tangy notes of lemon perfectly complement the sweet burst of raspberries, all nestled within a tender, moist crum extractb. This cake is not only a feast for the senses but also a wonderfully forgiving recipe, making it perfect for both novice bakers and seasoned pros looking for a guaranteed crowd-pleaser. Whether you’re celebrating a special occasion or simply craving a delightful treat, this Raspberry Lemon Cake is sure to hit the spot.
This recipe has been developed to deliver a beautiful texture and incredible flavor, with a particular focus on ensuring it’s a joy to make. We’ll walk through each step, offering little tips and tricks along the way to help you achieve bakery-quality results in your own kitchen. The key is in the details, from the room temperature ingredients to the gentle folding of the delicate raspberries.
Ingredients:
Making the Cake Batter
This is where the magic begin extracts! We’ll start by creaming the butter and sugar together, which is a crucial step for developing a light and airy cake. Using room temperature butter ensures it whips up beautifully with the sugar, creating tiny air pockets that will expand in the oven, contributing to the cake’s tender texture.
1. Preheat your oven to 350°F (175°C). Grease and flour two 9-inch round cake pans. You can also line the bottoms with parchment paper for extra insurance against sticking. This preparation ensures your beautiful cakes will release easily once baked. In a large bowl, cream together the 1 cup of room-temperature unsalted butter and 1 ½ cups of sugar until the mixture is light and fluffy. This process can take about 3-5 minutes with an electric mixer. It’s important to scrape down the sides of the bowl a few times to ensure everything is incorporated evenly.
2. In a separate medium bowl, whisk together the gluten-free flour, baking powder, baking soda, and salt. Having these dry ingredients measured out and ready to go makes the subsequent steps much smoother. Sifting your gluten-free flour can also help to aerate it, contributing to a lighter cake crum extractb, though it’s not always strictly necessary with all gluten-free blends.
3. Add the 3 large eggs, one at a time, beating well after each addition. This gradual incorporation of eggs helps to emulsify the batter and build structure. Next, beat in the 1 cup of unsweetened plain yogurt, ¼ cup of milk, 3 tablespoons of lemon zest, and ⅓ cup of lemon juice. The yogurt adds moisture and a slight tang, while the lemon zest and juice provide that incredible, bright citrus flavor that defines this cake. Mix until just combined; be careful not to overmix at this stage, as it can lead to a tougher cake.
4. Gradually add the dry ingredients to the wet ingredients, mixing on low speed until just combined. Again, the key here is to avoid overmixing. Stop mixing as soon as you no longer see streaks of dry flour. A few small lumps are perfectly fine. Overmixing gluten-free batters can sometimes lead to a gummy texture, so err on the side of caution.
5. Gently fold in the 2 cups of fresh raspberries. It’s important to do this carefully to avoid crushing them too much, as they will release their juices and color into the batter, creating beautiful pink swirls. If your raspberries are particularly large, you can gently halve or quarter them before folding them in. This gentle folding ensures the raspberries are distributed throughout the cake without breaking down the batter’s structure. Divide the batter evenly between the prepared cake pans.
Baking and Cooling
Now for the satisfying part – watching your cake transform in the oven!
Bake for 30-35 minutes, or until a wooden skewer or toothpick inserted into the center of the cakes comes out clean. The aroma that will fill your kitchen during this time is simply heavenly! Once baked, let the cakes cool in their pans on a wire rack for about 15-20 minutes. This initial cooling period allows the cakes to firm up slightly, making them easier to handle. After this, carefully invert the cakes onto the wire rack to cool completely. It’s absolutely crucial that the cakes are completely cool before you attempt to frost them, otherwise, the frosting will melt and slide right off.
Making the Lemon Buttercream Frosting
A light and fluffy buttercream is the perfect partner for our vibrant cake. This lemon-infused frosting adds another layer of tangy sweetness that complements the cake beautifully.
1. In a large bowl, beat the 2 cups of room-temperature unsalted butter until it’s smooth and creamy. This will take a few minutes with an electric mixer. Make sure your butter is truly at room temperature – not melted, but soft enough to be easily indented with your finger.
2. Gradually add the 5 cups of powdered sugar, about a cup at a time, beating on low speed until each addition is incorporated. Once all the powdered sugar is added, increase the mixer speed to medium-high and beat for an additional 2-3 minutes until the frosting is light and fluffy. If the frosting seems too thick, you can add a teaspoon of milk or lemon juice at a time until you reach your desired consistency.
3. Stir in the 2 teaspoons of lemon juice. Taste and adjust with a tiny bit more lemon juice if you prefer a more pronounced citrus flavor. Be careful not to add too much liquid, or your frosting could become too runny. This frosting is wonderfully light and has just the right amount of tang to balance the sweetness of the cake.
Assembling Your Masterpiece
With your cakes cooled and frosting ready, it’s time to bring it all together.
1. Once the cakes are completely cool, place one cake layer onto your serving plate or cake stand. Spread a generous layer of the lemon buttercream frosting over the top of this first layer, ensuring you go almost all the way to the edge.
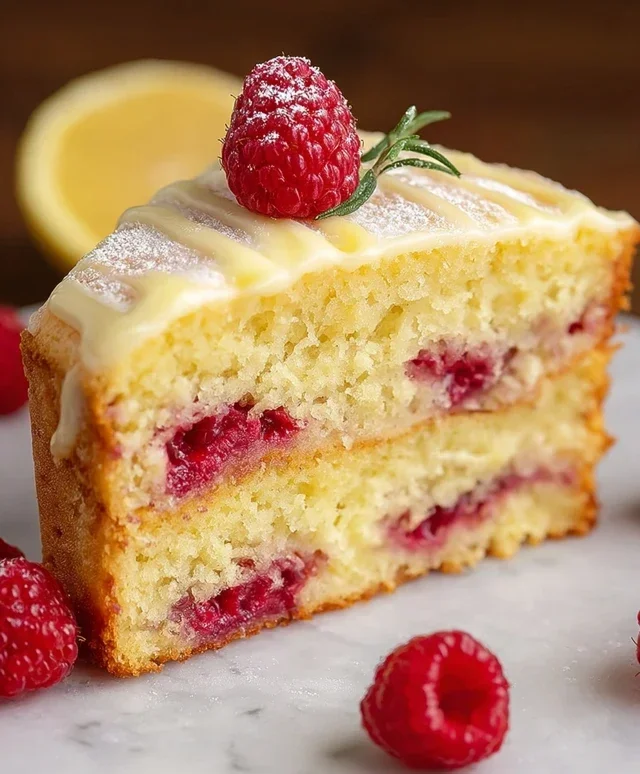
2. Carefully place the second cake layer on top of the frosting. Now, frost the top and sides of the entire cake. You can use an offset spatula to create smooth sides or leave them a bit more rustic. For a beautiful finish, you can even pipe some extra frosting swirls on top and garnish with a few fresh raspberries and a sprinkle of lemon zest. Enjoy every delightful bite of your homemade Raspberry Lemon Cake!
Conclusion:
I hope you’re as excited to bake this Raspberry Lemon Cake as I am to eat it! This recipe truly is a showstopper, offering the perfect balance of tart lemon zest and the sweet burst of fresh raspberries. It’s wonderfully moist, incredibly flavorful, and surprisingly straightforward to make, making it ideal for both novice bakers and seasoned pros looking for a delightful treat. Whether you’re celebrating a special occasion or simply craving a slice of sunshine, this cake is sure to impress.
For serving, I love to keep it simple with a dusting of powdered sugar or a light drizzle of lemon glaze. However, a dollop of freshly whipped cream or a scoop of vanilla bean ice cream takes it to another level of decadence. If you’re feeling adventurous, try adding a layer of raspberry jam between cake layers for an extra fruity punch, or swap out raspberries for blueberries or even a mix of berries for a delightful variation. Don’t hesitate to get creative! I genuinely encourage you to give this Raspberry Lemon Cake a try – you won’t regret it!
Frequently Asked Questions:
How do I ensure my raspberries don’t sink to the bottom of the cake?
To prevent your raspberries from sinking, gently toss them in a tablespoon of the dry cake flour mixture before folding them into the batter. This light coating helps them suspend more evenly throughout the cake.
Can I use frozen raspberries instead of fresh?
Absolutely! If using frozen raspberries, make sure they are completely thawed and patted dry with paper towels to remove excess moisture. This will prevent your cake from becoming too wet.
What kind of pan is best for this Raspberry Lemon Cake?
A standard 9-inch round cake pan works beautifully for this recipe. You can also adapt it for cupcakes, adjusting the baking time accordingly.
Raspberry Lemon Cake
A moist and flavorful gluten-free cake bursting with fresh raspberries and zesty lemon, topped with a creamy lemon frosting.
Ingredients
-
3 cups gluten-free flour
-
1 ½ cups sugar
-
1 cup unsalted butter, room temperature
-
1 cup unsweetened plain yogurt
-
¼ cup milk
-
1 tbsp baking powder
-
¾ tsp baking soda
-
½ tsp salt
-
3 eggs
-
3 tbsp lemon zest
-
⅓ cup lemon juice
-
2 cups fresh raspberries
-
2 cups unsalted butter, room temperature
-
5 cups powdered sugar
-
2 tsp lemon juice
Instructions
-
Step 1
Preheat oven to 350°F (175°C). Grease and flour a 9-inch cake pan. -
Step 2
In a large bowl, cream together the softened butter and sugar until light and fluffy. -
Step 3
Beat in the eggs one at a time, then stir in the yogurt, lemon zest, and lemon juice. -
Step 4
In a separate bowl, whisk together the gluten-free flour, baking powder, baking soda, and salt. Gradually add the dry ingredients to the wet ingredients, alternating with the milk, mixing until just combined. Gently fold in the fresh raspberries. -
Step 5
Pour the batter into the prepared cake pan and bake for 30-35 minutes, or until a wooden skewer inserted into the center comes out clean. -
Step 6
Let the cake cool in the pan for 10 minutes before inverting it onto a wire rack to cool completely. -
Step 7
While the cake cools, prepare the frosting: In a medium bowl, beat the softened butter until creamy. Gradually add the powdered sugar and 2 tsp lemon juice, beating until smooth and spreadable. -
Step 8
Once the cake is completely cool, frost generously with the lemon frosting.
Important Information
Nutrition Facts (Per Serving)
It is important to consider this information as approximate and not to use it as definitive health advice.
Allergy Information
Please check ingredients for potential allergens and consult a health professional if in doubt.